Ada beberapa prinsip dasar yang membuat web design itu bisa terlihat bagus.
Banyak orang bilang desain itu relatif, kenapa? karena, misal: buat beberapa orang website banyak warna itu bagus dan menarik, tapi buat sebagian orang malah terlihat kuran baik dan norak. Ada yang menyebut minimalis itu baik, tapi ada yang mengejek minimalis itu sebagai desain yang biasa-biasa saja.
Perdebatan itu tidak akan ada habis nya, karena isi kepala orang berbeda-beda, cara pandang orang berbeda-beda.
Namun ada beberapa faktor yang pasti dan akan mempengaruhi pandangan orang tentang suatu desain website akan menjadi terlihat baik. Setidaknyakita sebagai Web Designer harus sukses menyampaikan isi pesan utama yang ada di website yang kita buat. Itulah tujuan dasar yang harus dipegang teguh oleh para pembuat website.
Berikut adalah beberapa diantaranya hal-hal penting yang harus diperhatikan :
Walau bagaimanapun sistem navigasi adalah senjata utama sebuah website, jika sistem navigasinya tidak baik (penempatan dan bentuknya) maka pengunjung akan kebingungan, tersesat, sulit untuk menemukan informasi yang dia cari.
Jadi, walau bagaimanapun bentuk desain yang kamu buat, buatlah sistem navigasi ini dengan sebaik-baiknya, agar mudah diakses oleh pengunjung dan mudah untuk di mengerti alurnya.
2. Konsisten Dalam Hal Branding/Logo
Logo dan Nama website, ini termasuk hal penting dalam sebuah website, jadi buat ini sebaik-baiknya, bagaimana pun bentuk desain kamu, tempatkan logo ditempat yang mudah dilihat, karena ini adalah identitas utama website yang dibuat. Jangan sampai client tidak tau website yang dibukanya ini website siapa.
Selain penempatan yang benar, konsistensi dalam penempatan atau posisi juga harus diperhatikan, hindari posisi logo/brand ataupun identitas perusahaan itu berpindah-pindah posisi. Misal di Index logo ada di kiri atas, di halaman lain ada di kanan atas.
Masalah Branding biasanya terkait juga dengan warna website, warna website biasanya mengacu pada warna brand/logonya. Jadi buat konsisten pada bagian ini.
3. Menggunakan Gambar Dengan Baik.
Apakah anda tau, bahwa gambar atau Visualisasi lain adalah hal yang paling menarik bagi pengunjung website? terkadang visualisasi berupa gambar lebih di mengerti dibanding sekedar text, tidak heran sekarang banyak InfoGraphic, karena itu membuat orang lebih tertarik membacanya dibanding sekedar teks semua.
Anda tau bahwa banyak orang benci membaca buku yang isinya tulisan semua?
Gambar itu bisa diterima semua orang dengan baik, Anda juga tau bahwa sebagian orang membeli buku karena melihat cover nya yang bagus? Itulah beberapa bukti kekuatan sebuah gambar.
Jadi bermain-main lah dengan gambar di desain website anda, buat semenarik mungkin, dan sebaik mungkin.
4. Penggunaaan Font Dengan Baik (Typography).
Apasih isi dari sebuah website? Sebagian website yang ada di Internet terdiri dari TULISAN.
Oleh karena itu tulisan ini adalah sumber informasi utama yang diperlukan oleh pengunjung ketika mengunjungi suatu website, Jadi gunakan font secara bijak, gunakan font yang mudah dibaca oleh pengunjung.
Gunakan juga warna font yang jelas, jika background anda berwarna ORANGE, jangan lah menggunakan font berwarna KUNING, karena membuat tulisan jadi tidak jelas, tapi gunakan font berwarna gelap, seperti warna Hitam atau Coklat.
5. Pintar Memanfaatkan Multimedia.
Sama halnya dengan gambar, Video atau Multimedia lain nya sangat disukai oleh sebagian orang, makanya tidak heran kalau Televisi lebih Populer dibandingkan dengan RADIO.
Karena dengan multimedia orang akan lebih mudah mengerti, karena di multimedia seperti video, biasanya terdiri dari Gambar, Suara dan Gerakan. Ini lebih cepat dimengerti oleh orang lain. Ingat bahwa tidak semua orang yang mengunjungi website kita tahan membaca tulisan yang panjang dan tidak menjamin juga dia mengerti apa yang kita tulis, namun dengan Video atau Multimedia, Tulisan tidak jelas, masih ada Suara, suara tidak jalas masih ada gerakan-gerakan visual. Jadi lebih mudah di mengerti bukan?
Sekian tulisan kali ini, semoga berguna untuk anda.
Istilah dalam Internet ada banyak sekali, mungkin banyak diantaranya yang tidak anda ketahui. Artikel ini akan membahas beberapa Istilah yang cukup penting untuk diketahui di dalam internet, diantaranya pengertian dari blog, seo, cloud computing, tagging, javascript, social media, dan lainnya.
Content Management System adalah sebuah aplikasi web yang digunakan untuk membuat dan mengedit konten web. CMS ini biasa terintegrasi dengan website itu sendiri. CMS dibuat untuk memudahkan dalam membuat dan mengedit konten web karena interfacenya yang user-friendly tanpa harus berhadapan dengan kode HTML.
Bila kita membutuhkan CMS bisa meminta web programmer untuk membuatkannya atau kita bisa menggunakan CMS open source yang telah terbukti handal dan gratis seperti Joomla, WordPress, Drupal dan masih banyak lagi.
Blog
Berasal dari kata web log yang merupakan jurnal atau diari online. Terdiri dari artikel -artikel yang membicarakan suatu subyek seperti teknologi, software, desain, kesehatan, lingkungan, fashion dan sebagainya.
Social Media
Aplikasi berbasis web yang memfasilitasi orang – orang dalam komunitasnya membicarakan suatu ide, topik atau berbagi ide, topik dan konten tertentu seperti foto, video, artikel, link. Sebagai contoh social media yang populer Facebook, Twitter, Instagram, Google+.
Bandwith
Jumlah data yang bisa dibawa dari satu titik ke titik lainnya dalam jangka waktu tertentu atau sering dinamakan data transfe rate. Bandwith diukur berdasarkan bps (bit per second), semakin tinggi nilainya berarti semakin banyak data yang bisa dibawa atau semakin tinggi data transfer ratenya.
Tagging
Istilah tagging sering kita jumpai di blog, dimana pemiliknya memberi nama/label pada konten (artikel/image) dengan tujuan untuk mengelompokkan artikel/image tersebut berdasarkan tagging. Sebagai contoh kita temui di blog tentang desain web pada kolom kiri atau kanan terdapat kumpulan tagging berupa nama tertentu seperti CSS3, HTML, design, layout, responsive web design, dan sebagainya.Bila masing-masing tagging di klik maka akan tampil halaman web dengan artikel-artikel yang mewakili tagging tersebut.
Javascript
Scripting languange yang yang biasa digunakan bersama-sama kode HTML pada halaman web. Fungsi utamanya agar user dan halaman web bisa berinteraksi, yang mana hal ini tidak bisa dilakukan oleh kode HTML. Beberapa contoh yang bisa dilakukan oleh javascript : mendeteksi browser user, memvalidasi data form, memuat konten baru di halaman web secara dinamis tanpa harus merefresh halaman web.
SEO
Usaha yang dilakukan untuk mendapatkan posisi yang bagus (high rank) pada search engine seperti Google, Yahoo, Bing. SEO melibatkan teknik dan trik yang diaplikasikan pada suatu website diantaranya seperti pemilihan keyword yang tepat, membuat halaman web yang search-engine-friendly, integrasi ke social media dan masih banyak teknik lainnya.
ISP
Internet Service Provider adalah penyedia jasa koneksi internet bagi setiap individu.perusahaan yang ingin mendapatkan koneksi internet baik untuk kepentingan pribadi maupun kepentingan bisnis/perusahaan.
Keyword
Keyword atau kata kunci adalah referensi yang digunakan search engine dalam mencari suatu informasi/data yang ada di internet. Search engine seperti Google, Yahoo, Bing akan mencari kemudian menampilkan informasi/data tersebut di halaman web berdasarkan keyword (kata kunci) yang kita berikan.
Malware
Kependekan dari malicious software, aplikasi jahat yang disebar melalui email, website, file download yang bertujuan untuk mengganggu operasi komputer secara normal, mencuri informasi penting, mendapatkan akses ke sistem komputer. Yang termasuk dalam malware diantaranya virus, worm, trojan.
Cloud Computing
Layanan aplikasi yang terkoneksi lewat internet. Mengganti model kepemilikan aplikasi yang tadinya dibeli kemudian diinstal di komputer user menjadi sistem berlangganan dimana aplikasi tidak lagi diakses langsung dari komputer tapi dari internet.
Open Source Software
Istilah yang digunakan dalam konteks software komputer., dimana open source software adalah software yang bisa digunakan secara bebas oleh siapa saja (gratis/tanpa lisensi). Disamping siapa saja bisa menggunakannya secara gratis setiap orang pun bisa mengakses source code dari software tersebut, merubah source codenya dan mendistribusikannya secara bebas. Contoh software open source : Linux, Firefox, Chrome, Joomla, WordPress, OpenOffice, Apache, mySQL.
Bagi mereka yang tertarik dengan dunia web ada baiknya mengetahui terlebih dulu istilah-istilah yang dipakai di dunia internet sebagai pengenalan. Artikel ini saya bagi menjadi dua bagian, bagian 1 dan bagian 2 dan untuk bagian 2 akan menyusul. Di dunia internet ini profesi yang tersedia tidak hanya web desainer dan web programmer saja. Ada banyak peluang pekerjaan lain yang berkaitan dengan website, diantaranya SEO specialist, content creator, information architect, online marketer, blogger. Adapun istilah-istilah tersebut adalah sebagai berikut :
Internet
Ilustrasi: Internet
Jaringan (network ) dari seluruh komputer di dunia yang saling terhubung satu sama lain. Kumpulan dari jaringan komputer pribadi, publik, pemerintah, bisnis, di seluruh dunia yang membentuk jaringan besar yang saling terhubung melalui kabel maupun koneksi wireless. Secara sederhana bisa kita bayangkan internet adalah sebuah kota yang terdapat gedung, rumah, komplek perumahan, toko, kantor, stasiun, terminal yang saling terhubung melalui jalan besar maupun jalan kecil. Gedung, rumah, toko, kantor, stasiun dianalogikan sebagai jaringan komputer, jalan dianalogikan sebagai kabel, serat optik, koneksi wireless.
URL
Kependekan dari Uniform Resource Locator yaitu alamat dari sebuah halaman web atau sebuah website. Sebagai contoh : http://.www.detik.com. Untuk menuju alamat sebuah website atau suatu halaman web kita tinggal mengetik alamat tersebut di address baru sebuah browser.
HTTP
Apa yang kita lihat di layar komputer, notebook, tablet, smartphone saat mengakses sebuah halaman web adalah hasil dari permintaan browser kepada web server. Konten yang kita lihat seperti teks, image, video yang tersaji di layar komputer, notebook, tablet, smartphone dikirim dari web server ke browser. Komunikasi antara browser dan web server ini menggunakan HTTP (HyperText Transfer Protocol).
Browser
Sebagaimana kita menggunakan aplikasi Photoshop untuk edit image, MS Office atau Open Office utuk membuat/edit dokumen, membuat/edit spreadsheet, membuat presentasi dan lainnya. Browser adalah aplikasi software yang digunakan khusus untuk mengakses halaman web yang terdiri dari kode HTML. Ada beberapa browser yang paling banyak digunakan diantaranya Chrome, Mozilla, Internet Explorer, Opera, Safari.
IP addrress
Pada prinsipnya setiap komputer atau device yang terhubung ke internet memiliki alamat. Layaknya sistem alamat di dunia nyata, alamat ini sebagai identitas bagi setiap komputer atau device lainnya. Sebagaimana di dunia nyata untuk mengirim barang ke seseorang yang berada di suatu tempat tentu harus memiliki alamat, begitu pula dengan komputer yang terhubung dengan internet.
Domain
Domain name adalah nama yang bisa dipilih untuk menamakan suatu website yang berfungsi untuk mengidentifikasi sebuah website. Nama domain bisa dipilih dengan kombinasi dari huruf, angka, hyphens (-) lalu di ikuti dengan ekstensinya (.com, .net, .org dan seterusnya). Apabila ingin memiliki sebuah nama domain maka yang bersangkutan bisa membelinya.
Contoh :
datakekerasan.org
detik.com
intraktive.com
Web Page
Salah satu halaman dari sebuah website, ditulis menggunakan kode HTML yang berisi informasi atau link. Sebagai perumpamaan website adalah sebuah buku, web page adalah salah satu halaman dari website.
HTML
Kependekan dari Hypertext Markup Language, bahasa yang digunakan untuk membuat halaman web. Tag dan attribute HTML membentuk suatu halaman web.
CSS
Kependekan dari Cascading Style Sheets, kode yang digunakan untuk mengatur layout halaman web. CSS digunakan bersama-sama HTML dalam membuat halaman web, dimana CSS berfungsi mengatur semua berkaitan dengan style suatu halaman web sementara HTML berfungsi membangun kerangka halaman web.
Web Hosting
Salah satu kelebihan dari halaman web adalah ketersediaannya untuk diakses 24 jam dari mana saja lokasi pengakses berada selama terkoneksi dengan internet. Perusahaan web hosting memberikan layanan untuk itu, menyediakan software, hardware dan SDM mereka sehingga website bisa diakses selama 24 jam. Pemilik website hanya mengupload file webnya ke server yang ada di perusahaan web hosting.
Server-side
Operasi/kegiatan yang dilakukan di server dalam konteks hubungan server-client. Sebagai contoh saat mengakses sebuah halaman web di komputer menggunakan browser, browser adalah client yang mengirim permintaan kepada server. Kemudian server merespon permintaan client. Sebelum merespon permintaan client lebih dulu terjadi kegiatan di server, seperti menerjemahkan permintaan client, memproses, memilih data dan sebagainya.
Client-side
Operasi/kegiatan yang dilakukan di client dan tidak melibatkan server. Operasi yang terjadi hanya di browser, tidak ada permintaan data, verifikasi data ke server. Sebagai contoh sederhana saat user mengarahkan kursor mousenya (roll over ) ke menu sebuah website dan teks menu berubah warna, ketika user mengisi password saat registrasi di sebuah website yang menampilkan pesan bahwa password tidak boleh kurang dari 8 karakter.
Historical aviation art requires attention to detail as it is often
used to illustrate important historical subjects. While books remain
the most authorative source of information, the Internet can provide
enough general data to depict routine aircraft operations. This
painting will depict aircraft of the USAAF 94th Pursuit Squadron: From
this information elementary research reveals that during the war the
94th operated from Selfridge Air National Guard Base; an airfield
located within flying distance of the Great Lakes. Thus the decision
was taken to depict the aircraft in flight over water.
2. Create a Working Canvas
Step 1
To allow accurate depiction of fine detail, as large a canvas as the
computer can reasonable handle should be selected: In this case 5000 x 3337 pixels will suffice.
3. Reference Material
Step 1
Before painting begins, references need to be gathered. In the case
of the P-26A an example of the periods’ pilots’ flight gear was found
photographed in a museum, the desired aircraft marking scheme on a
flying replica, and a better view of the planes’ structure from an
example on display.
4. Create a Working Canvas
Step 1
With references gathered it is helpful to arrange them on a single
canvas, enabling easy viewing while working. Create a new canvas,
taller than wide, and array the references within. References arranged on a single canvas
Step 2
To enable the easy viewing of these references the canvas will need
to be duplicated and arranged around the workplace. Select Window > Arrange > New Window
for References to create a copy of the canvas and resize both the
original and the clone in a stack on the left side of the screen. Now
using the Zoom tool it’s possible to view different parts of the reference canvas simultaneously. Duplicate the canvas Arrange the canvases around the workspace
5. Sketching the Composition
With attention to the references, take a size 4 round brush and
sketch in the simple forms of the aircraft. The initial image needn’t
look fantastic but rather is necessary to establish the proportions of
the aircraft and its position in the composition. As you continue to
sketch, use your references to constantly refine the proportions of the
P-26A: This process is aided by using the known measurements of a part
of the aircraft, for example the engine cowling, and then using those
dimensions to judge how long the fuselage should be; in this example
the fuselage is approximately four engine-cowlings long.
Note that as work proceeds the canvas size may need to be changed, and in this case was made wider to take in the longer tail. Initial Sketch Body is rougly four ‘engine cowlings’ long Canvas is resized and the line art refined Detailed line art
6. Masking the P-26
With the line art complete, it’s time to begin the masking phase. Select the Line Art layer and reduce its opacity to around 10%,
making it almost invisible. Below this, create new layers as needed
for each major element of the aircraft and block in the basic colors
with a medium sized round brush. At this stage the color used is not
important, so bright hues that allow easy distinction between each
element are best. Take special care at this stage to get the masks the
correct shape, using the Zoom Tool to refine the edges. Line art ready for masking Change line art opacity to 10% and proceed with masking
7.Adding a Basic Sky
With the masking complete a basic background is added to guide the
final rendering of the aircraft. After setting a horizon line with sky
above and water below add simple shadows to the larger masked areas of
the aircraft to make color picking easier. Then take the Cloud Brush
and rough in cumulus covering the surface of the lake. Follow
references closely at this point, noting that with the chosen lighting
the clouds actually get darker on their thin outer edges and white
where denser towards their centres. Basic shading and cloud masses added More detail added to clouds
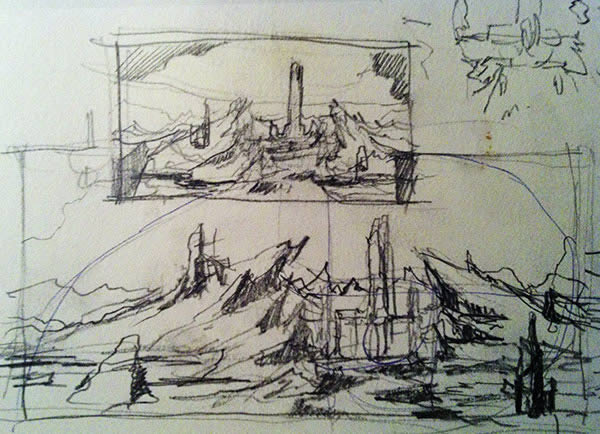
This first step allows us to brainstorm some ideas. In the beginning
of this stage, we really have no clear direction. We just let our
hands and mind do the talking. But if we have to capture an idea, we
must try and do as much doodling as we can. It doesn’t matter what
type of tool or medium you use just as long as you can express your
ideas on paper, or in some cases, digital paper.
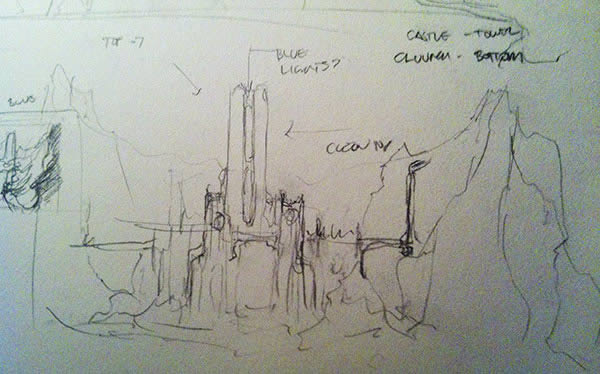
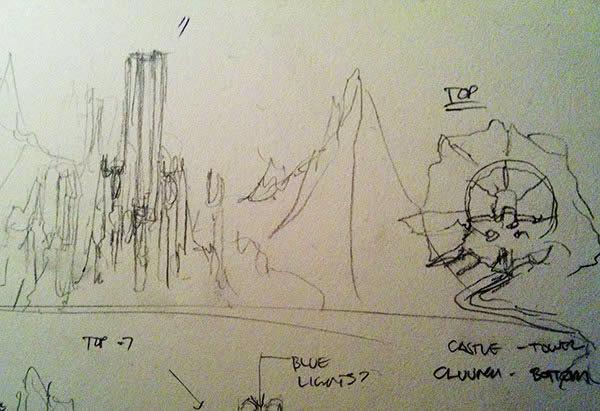
Tip: When sketching, it is encouraged that you try
and take your time to flesh out your ideas on paper. One way is to
create call outs to describe some parts of your sketches. Creating
variation based on look and perspective can give you a fresh new idea
on the same concept. Remember, there is no such thing as a ridiculous
idea, all ideas at this stage is useful. In our example sketches, added
notes and call outs were useful in describing certain details.
Step 2
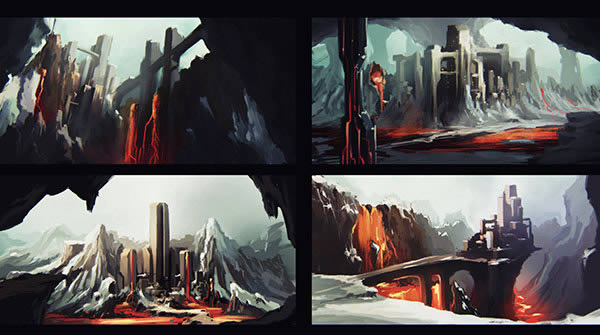
Once we have done that, you can now start compiling all your ideas
into 4 main concepts. Only choose the ones that you like. You have the
option to refine each sketch, but keep it along the concept that you
are aiming for. In our case, we want to create a castle enveloped by a
snow mountain surrounded by lava, two contrasting ideas that can be a
challenge to create.
Choose what you think is the best among the 4 that you have made.
Choose the one that can conveys your idea strongly. Refine the concept
and add proper framing and composition. Altering or changing some
parts to make it more pleasing to the eye. In some cases taking this
final concept and creating different views of it can also help. There
might be a better angle or perspective that you can "accidentally"
discover while exploring your idea. In some ways, 3D can be a great
tool at this stage, which leads us to.
2. Form Building
Form building is the next step to flesh out your ideas. Some
mattepainters are great at creating form using hundreds of references,
others prefer 3D. Whatever tool or step you might take, always consider
the time that you will spend on creating your piece, especially with
pressure from deadlines. This is a critical part since we might waste a
lot of time if we press on the wrong direction.
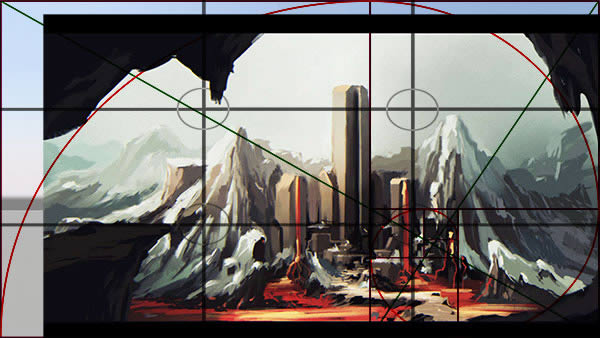
We start making our form by refining our composition. We take our
initial sketch and overlay some common composition lines over it to
refine the flow and look of our final image. Feel free to edit or
transform your image at this stage.
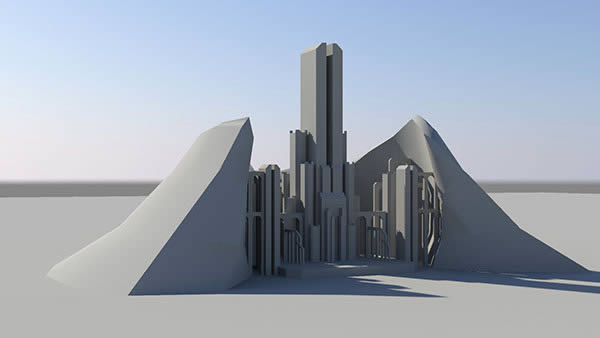
Next, we will be using 3D as our tool of choice for creating the
subject of our work. We’ve chosen 3D for its versatility and level of
control. We can always come back to our 3D model and render different
views of the same model and change the texture and lighting when we want
too. This is true of most studio workflows where time is critical and
versatility is a must. Form blocking in 3D is also better at providing
us with accurate light and shadow direction. However, since this is a
pure Photoshop tutorial, we will not dwell on 3D building the castle,
but focus more on how we can enhance and integrate our pre-rendered
castle into our painting.
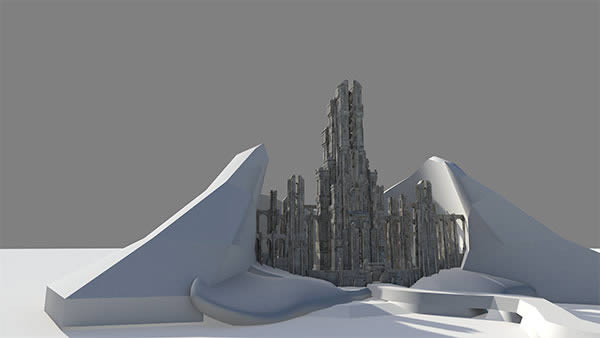
We have provided a pre-rendered 3D image of the castle that we are
going to use. You can also find several renders of the castle with
different textures and one EXR file that has passes to be used on
editing the pre-rendered images. Besides the images, we have also
included the 3D model and its textures in different file format which
you, in your end, can explore how to enhance or recreate the scene that
fits your concept.
2. Creating Mountains
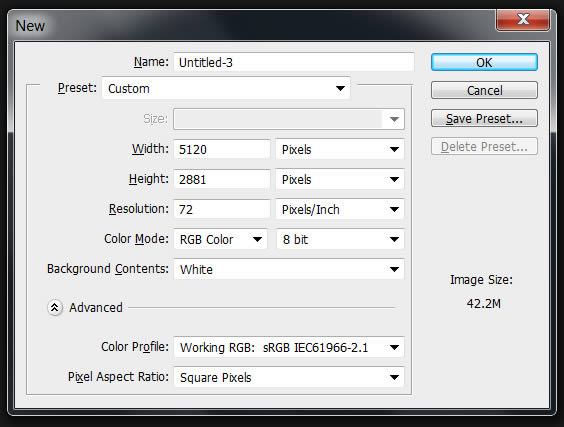
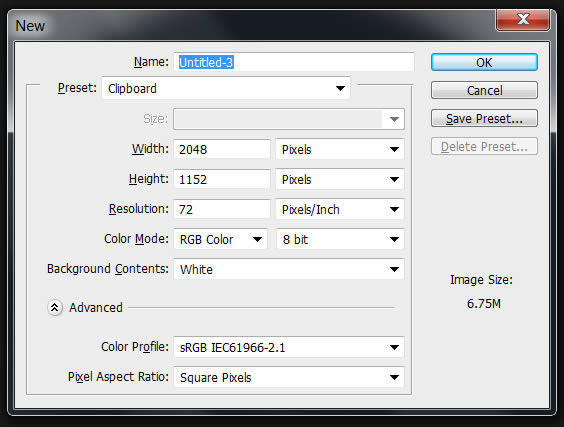
Before we begin, let’s create a new file.
Our final image will then be delivered at this resolution. However if
your computer cannot handle large files, you are allowed to work on any
manageable resolution. But to fully appreciate your painting, I would
recommend your final delivery to be around the HD size, 1920×1080
pixels.
Step 1
Now on to the Fun stuff! Let’s start off with the mountains. We are
starting with the mountains because they are the biggest part of our
painting. It is also the part that frames our Castle.
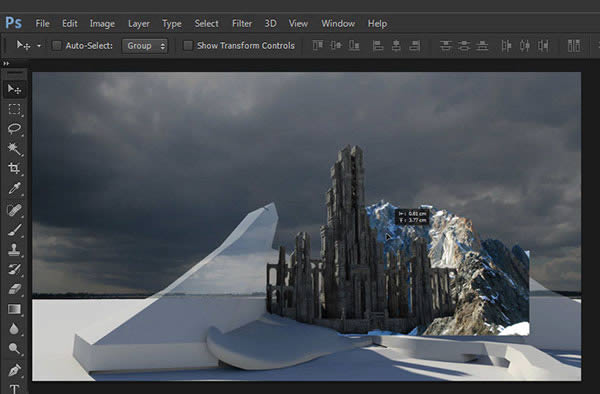
First we will use our castle render as our base for the shape and
look of the mountains (see 3D render image below). Then we will proceed
with blocking the mountains really quickly to get an overall look and
feel of the painting.
Step 2
Block the mountains with the reference image that we have provided.
At this stage we are just free forming our painting. Grab any image that
you think can work. This will be changed later on with a better image,
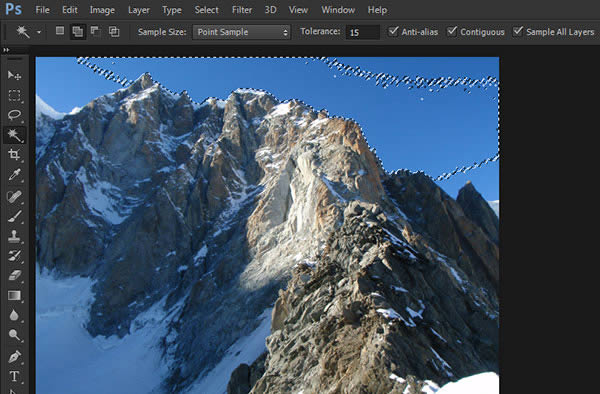
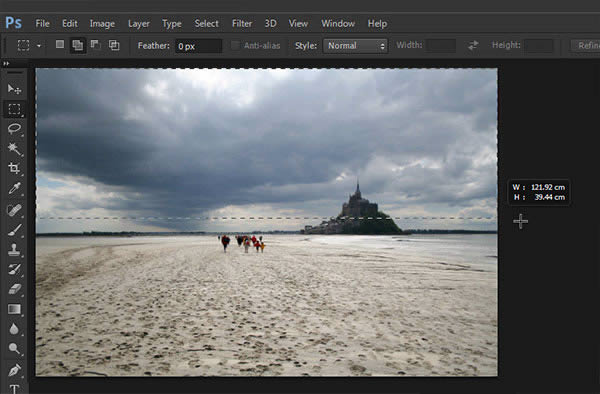
we just need to see something really quickly. Use the Magic Wand Tool and quickly select the blue skies.
Step 3
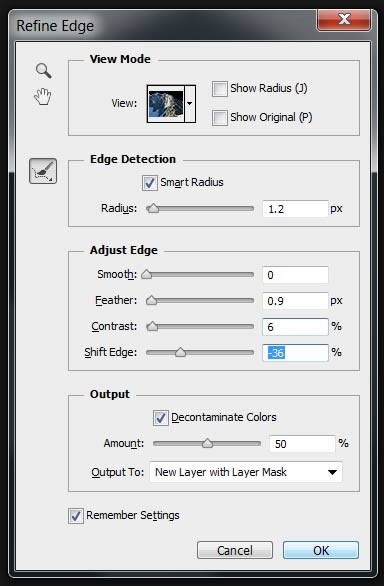
Once that’s done, invert your selection (Shift + Command/Ctrl I) or going to tab menu "Select – Inverse." Once your selection is inverted refine the edge (Command/Ctrl + Alt + R) or tab menu (Select – Refine Edge) When you have set you settings, always tick "Remember Settings"
to save your current settings. This is useful as you have a preset that
can be edited faster especially if you have a slower computer.
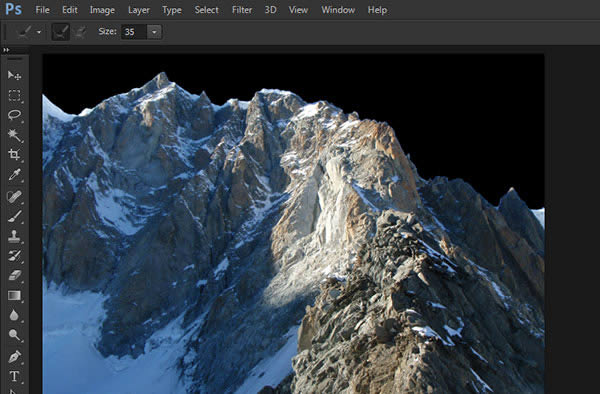
Final "Cut" image should be similar to this:
Step 4
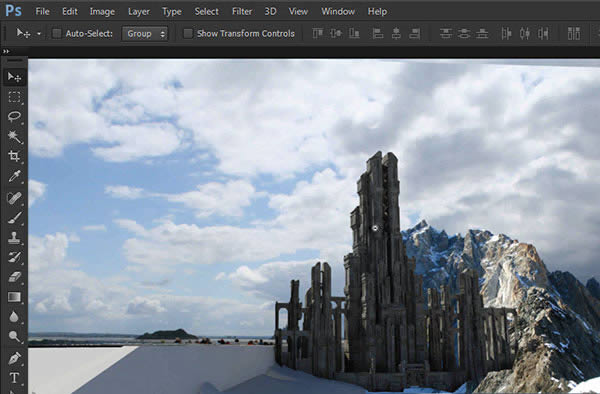
Add a "blocking" sky, it can be 2 or 3 variances of sky that can later be mixed or changed.
Add the skies and the blocking mountain behind the castle.
Integrate it as you go.
Step 5
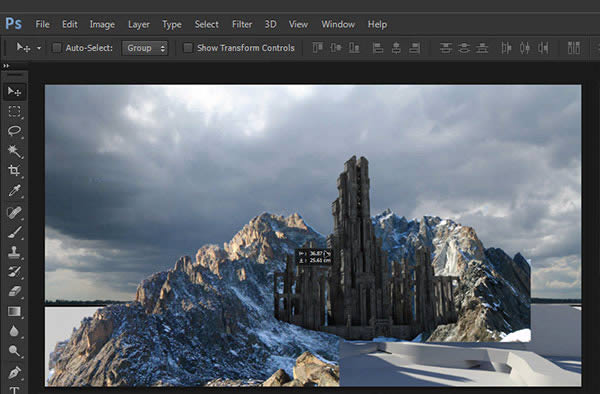
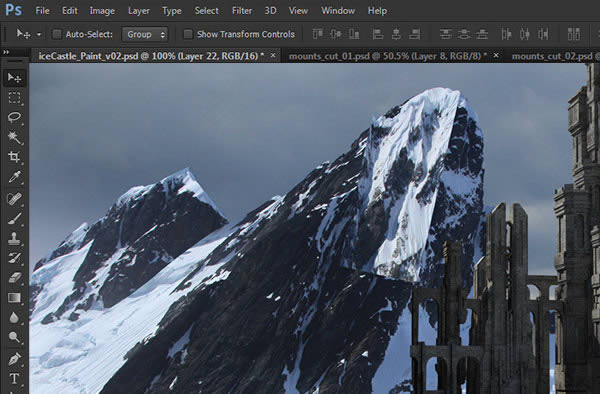
Taking another blocking mountain image, masked it out and add it as a left side blocking piece for the mountain background.
Step 6
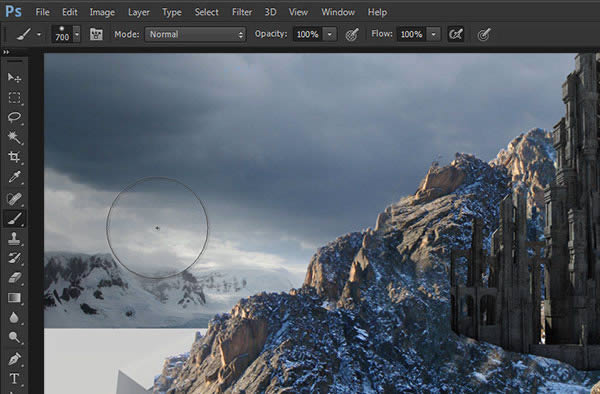
Take another mountain from the references and use it to block out the furthest part of your painting. A simple soft brush
can quickly integrate it with your current painting. Just be sure that
you are choosing the right image that goes with your sky.
Step 7
Here is where everything starts to get interesting. At this point we
are done with the preliminary blocking. We start off by creating our
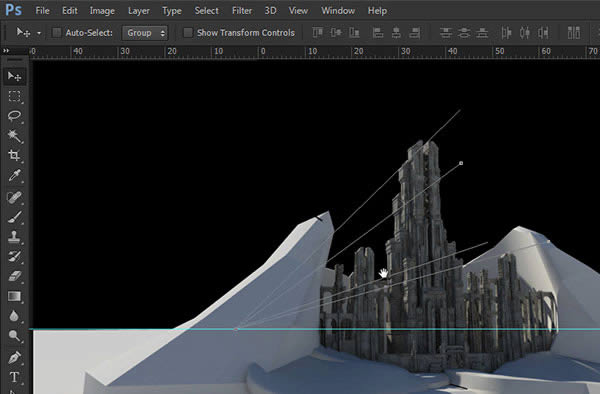
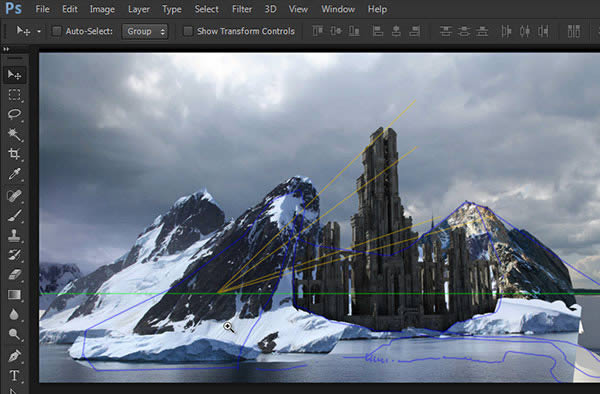
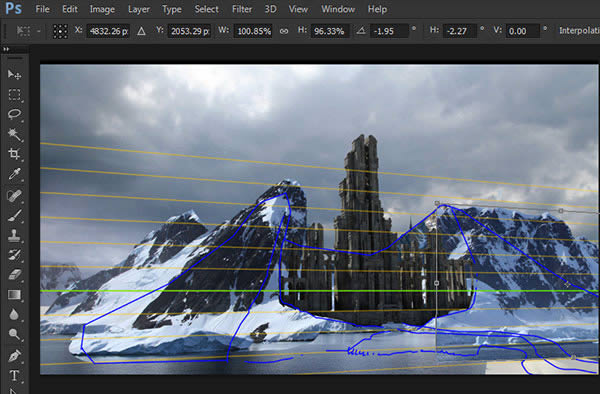
first perspective lines using the Pen Tool (P). Choose
a side from the building, using it as a guide, click and drag your
first point to the left side of the painting. Do this again and again
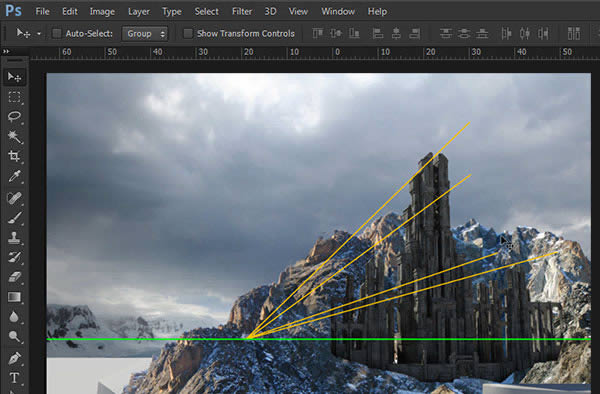
until you can find where the vanishing point is. This will be our first vanishing point. Be sure to mark your vanishing point with a Guide Line.
When you are satisfied with the perspective lines you have created, paint over the lines. Select a Hard Round Brush, set the size to 1 or a bit bigger depending on the size of your canvas. Then go back to pen tool, (Command/Ctrl + left click) on the canvas to unselect any lines, right click then from the drop down menu select "Stroke Path" the choose the "Brush Tool" from the selection and hit OK. Depending on the current foreground color, the resulting line should look like the one below.
Step 8
Once you have set up your perspective lines, you can now start
building up your main mountains. We start off with a mountain that has a
more snow on it. It also comes from a set of images with the same
character, enabling us to edit it faster and easier to integrate.
Step 9
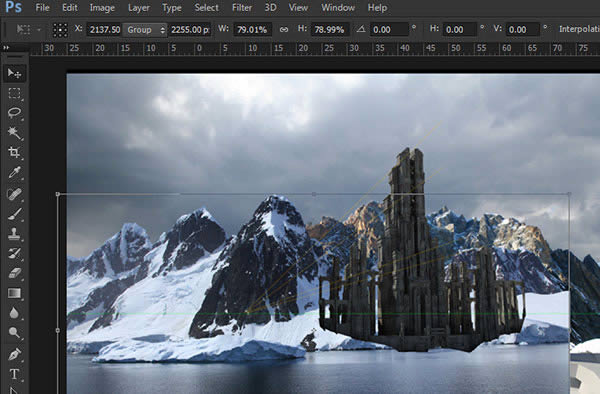
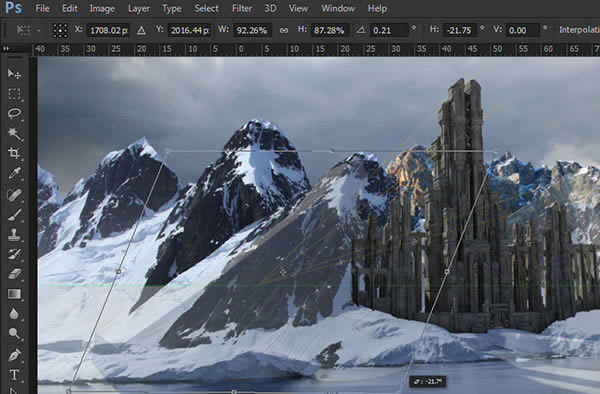
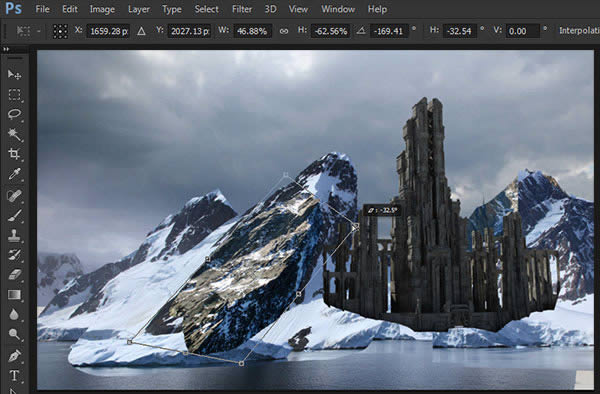
Start transforming your mountain to follow our blocking render. Lower down the opacity of your pasted mountain and Right Click – Free Transform. It doesn’t have to be accurate, but try to keep the established look as much as possible.
Step 10
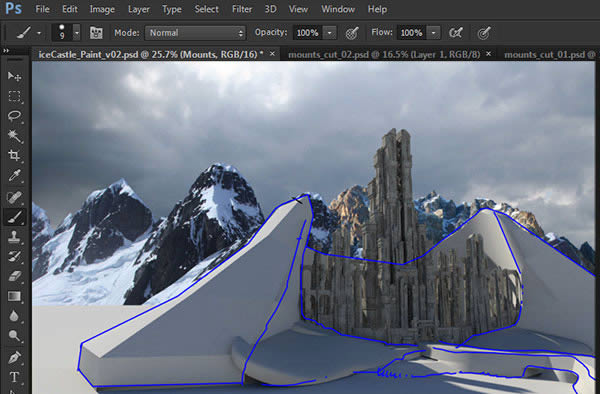
Another way to get the form of your concept to your images is to
create an outline of your existing blocking render. Just quickly paint
over the outline of the 3D mountain on another layer.
Step 11
Once that is done, you can go back and keep on transforming your reference images to reflect the outlines that you just created.
Step 12
Were now moving towards screen right of our painting. Now it’s time
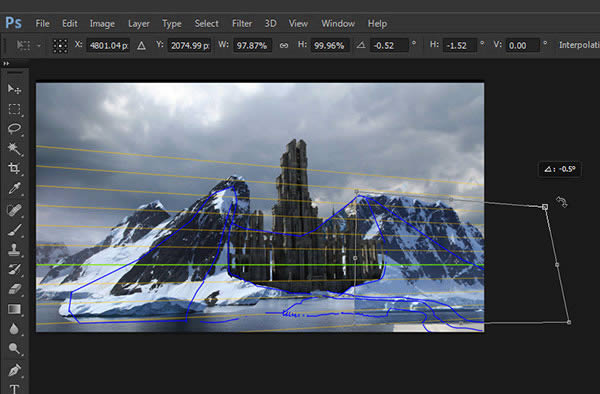
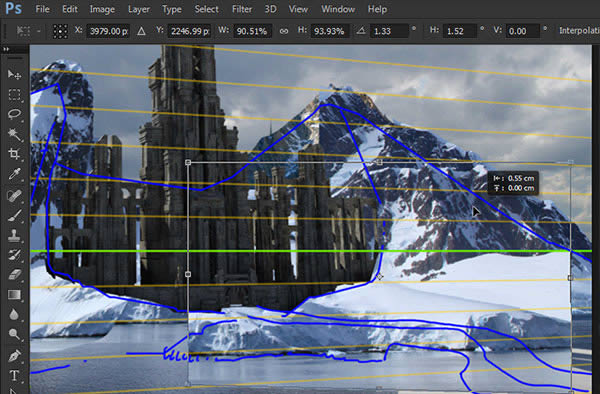
to create the second set of vanishing point. Let’s try and create these
lines following the edges of the front face of our castle.
Tip: Try to keep your perspective lines and painted
outlines in one folder. That way, you can easily turn them on and off as
a group. At the same time its good practice to create groups for your
elements. A classic group naming would be BG – Background, MG – Midground and FG – Foreground. You can also group each element according to their type e.g. mountain, castle, sky etc.
Step 13
Once that is done, we continue to build upon our painting by
importing images from our reference folder and transforming them to fit
over the form that we have established.
At this stage, the process is very organic. Any image you will use
will work just as long as you follow the curvature of your blocking
render. Keep in mind that slanted edges should have slanted faces. So if
you are using a reference that has a much more vertical face, be sure
to transform it to follow the contour of the blocking render
Step 14
We keep on working on the mountain using our second perspective lines
as vanishing point. At this point, we are adding the foreground
element, creating an entrance to our castle.
Since our process is very organic, you can keep on adding elements that you think would work well with the image your building.
Step 15
Add another mountain element on your current painting. Based on
your reference 3D image, try to look for a mountain that has a much more
rocky surface, or less snow on top. We want to wrap our castle on a
hard surface showing how massive and fortified it is in contrast to the
snow which is quite soft and clean and volatile.
Step 16
Add some tip details to the edges of the mountain. When selecting for
the tip on the mountains in your painting, try to look for the ones
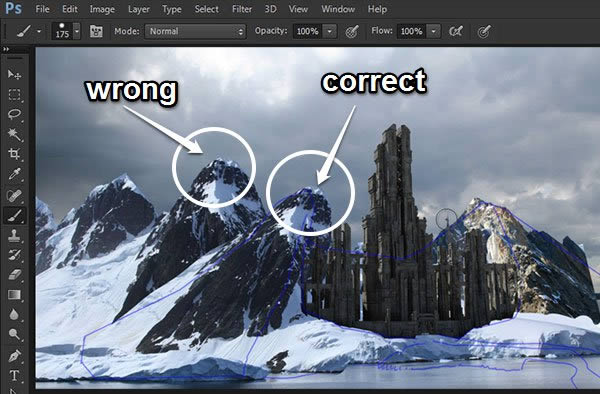
that are tips themselves. It’s easier to have them match rather than
carving a piece of image to make it look like a tip